

In part 1 we created a template for the main scratchplate and in part 2 brass sheet was cut out and shaped to form the scratchplate.
Now came the tricky part – what to do about the bridge and tailpiece?
The guitar originally had a stamped steel scratchplate with the strings anchoring directly to it as in the photo below.

As the raised part that the strings were anchored to would be extremely difficult to replicate in brass, the first thought was to use commercially available parts that were sympathetic to the look and feel of the original. A quick rummage around the workshop came up with suitable candidates…

On further reflection though, there were some serious problems:
- the bridge was intended for an archtop so the baseplate is curved
- the saddles are compensated which is not correct for a lap steel
- the tailpiece looks too modern and is a slightly different colour to the bridge
All in all then, this wasn’t going to work so back to the drawing board…

This was looking better. The bridge will be made from brass bar and the front of the saddle will be parallel to the frets at the correct distance for the scale length (25″). In keeping with the angled bridge, the pickup too has been angled which will help give the low strings more bass and the top strings more highs. The pickup base plate is shown (light green dashed line) to check that it will fit in the cavity (red dashed line) and also the bridge mounting holes can be seen relative to the cavity.
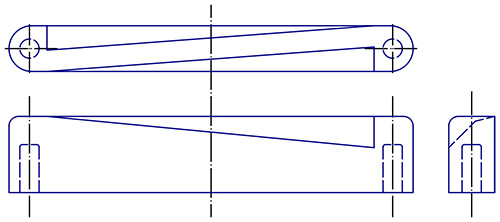
So far so good, but how are the strings going to be attached to this end of the guitar? After a little more time a design emerged which employs a similar motif to the scratchplate…
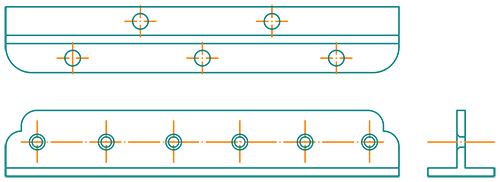
Now that the bridge and tailpiece have been designed, it’s time to drill holes for the controls, mounting screws and the pickup in the scratchplate.

The tailpiece is shaped from a piece of brass T-section and the holes for mounting screws and strings drilled…

In part 4 – building the bridge…
